Building an AI Agent Using Langraph: A Step-by-Step Guide
Artificial Intelligence (AI) agents are transforming the way we interact with technology, making automation, decision-making, and personalized experiences more efficient. One powerful tool for building AI agents is Langraph, a framework that enables the design and deployment of complex AI workflows with ease. In this blog, we’ll explore how you can build an AI agent using Langraph, from understanding its core components to implementing a functional agent.
CODING
2/10/20252 min read
What is Langraph?
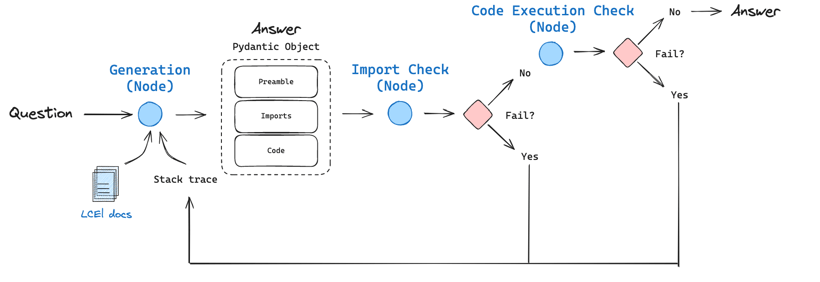
Langraph is a powerful framework that allows developers to create AI workflows using a graph-based approach. It enables modular construction of AI agents by linking various AI components like language models, retrieval mechanisms, and decision-making processes. Langraph provides a user-friendly interface, making it accessible for both beginners and experienced developers.
Key Features of Langraph:
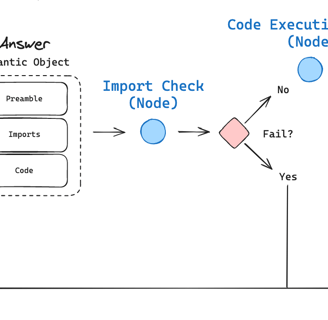
Graph-based Workflow: Visualize and structure AI workflows effectively.
Integration with LLMs: Supports integration with models like GPT, Llama, and Claude.
Event-Driven Execution: Efficiently manages triggers and actions.
Scalability & Flexibility: Works with various APIs and databases.
Steps to Build an AI Agent Using Langraph:
Step 1: Define the AI Agent's Purpose
Before coding, outline the role of your AI agent. Will it be a chatbot, a personal assistant, or an automated data processor? Clear objectives will help in structuring the workflow.
Step 2: Set Up Langraph
To get started, install Langraph using Python:
pip install langraph
Then, import the necessary modules in your Python script:
from langraph import Graph, Node
Using Langraph’s graph-based structure, define how your agent will process inputs and generate responses. For example:
Step 3: Design the AI Workflow
graph = Graph()
tokenizer = Node("Tokenizer", lambda x: x.split())
llm = Node("LLM", lambda x: f"AI Response: {x}")
graph.connect(tokenizer, llm)
This setup defines a simple AI agent that tokenizes input text and processes it through a language model.
Step 4: Integrate with LLMs
Connect your AI agent to a Large Language Model like OpenAI’s GPT:
from openai import OpenAI
def generate_response(prompt):
client = OpenAI(api_key='your_api_key')
response = client.ChatCompletion.create(model="gpt-4", messages=[{"role": "user", "content": prompt}])
return response["choices"][0]["message"]["content"]
llm = Node("LLM", generate_response)
Step 5: Implement Decision Logic
You can enhance the AI agent’s decision-making by adding conditional nodes:
def decision_logic(input_text):
return "Action A" if "help" in input_text else "Action B"
decision_node = Node("Decision", decision_logic)
graph.connect(llm, decision_node)
This ensures the AI agent responds based on specific keywords or logic.
Once the workflow is built, deploy it as a service:
Step 6: Deploy the AI Agent
Building an AI agent with Langraph simplifies workflow structuring and enhances AI-powered applications. With its modular and event-driven approach, you can create intelligent agents for various use cases, from customer support to data analysis. By following the steps outlined in this guide, you can develop, test, and deploy a functional AI agent efficiently.
Conclusion